I promised that this blog would involve more than just me bitching about my life and raising kids, and today I keep that promise.
I am a cake decorating instructor, and I occasionally make cakes, for friends and family. This past weekend I spent my time making a baby shower cake for my mom's good friend.
I decided to take pictures as I baked, so I could blog some tips and tricks. So here we go.
Anytime I bake a cake 10" or larger I find the middle takes FOREVER to cook. Well, take a Wilton #7 Flower nail (the old metal ones) and place it upside down in the middle of your greased cake pan. Grease it, then pour in your cake batter.
The flower nail will heat up as the pan does, and bake your cake from the inside, as the pan bakes it from the outside and bottom.
When the cake is done, and after it cools for at least 15 minutes, the nail will slide right out. Fooling with the cake before it has cooled at least 15 minutes, will most likely result in your cake cracking, or breaking apart.
To let my cakes cool/rest properly, I like to turn them upside down on a cooling rack. I place a paper towel in between the cake and the rack to prevent the grid cutting into the cake, and to catch some of the escaping steam. The paper towel will collect some of the moisture and prevent the cake from becoming too sticky. To make sure the cake cools slowly (to prevent drying out too much) I place the cake pans over the cake, on top of the cooling rack. The steam coming out of the cake will rise, hit the pan, and circulate back into the cake...this makes the cake more moist in the long run.
I then let my cake cool like this for AT LEAST 2 hours.
One more tip for today. I learned this weekend to NOT use heavy cream, even blended with whole milk, in icing. This made my icing crust over too much and I wasn't able to smooth the icing as well as I wanted to. The icing tasted great, but the structure was all wrong.
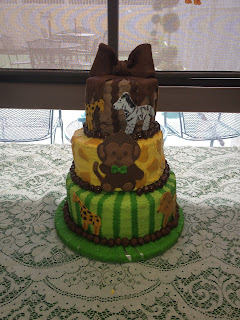
Here is a picture of the completed cake...
...and a few close ups of the individual tiers...The animals were cut out of fondant and hand painted to create the completed look.
The Monkey was actually done completely by hand, no cookie cutters. I had to use a craft knife to create the outline, then I layered the light brown accents on top.
This bow was hand made out of chocolate fondant/gum paste blend. It had to dry overnight to hold the shape, and is completely edible.
The bottom cake was a 10" White cake/buttercream filling, the middle was an 8" vanilla cake/strawberry filling, and the top was a 6" chocolate/chocolate mousse filling. Each tier had 4 layers. The border and bow were made from chocolate fondant, and the rest of the accents were made from vanilla fondant.
Total bake time was just over 3 hours combined, and the total decorating time was about 5 hours, not including drying/resting time.
If you have any questions, please feel free to leave comments or email me directly!


No comments:
Post a Comment